Boymom
*German version below | Deutsche Version unten*
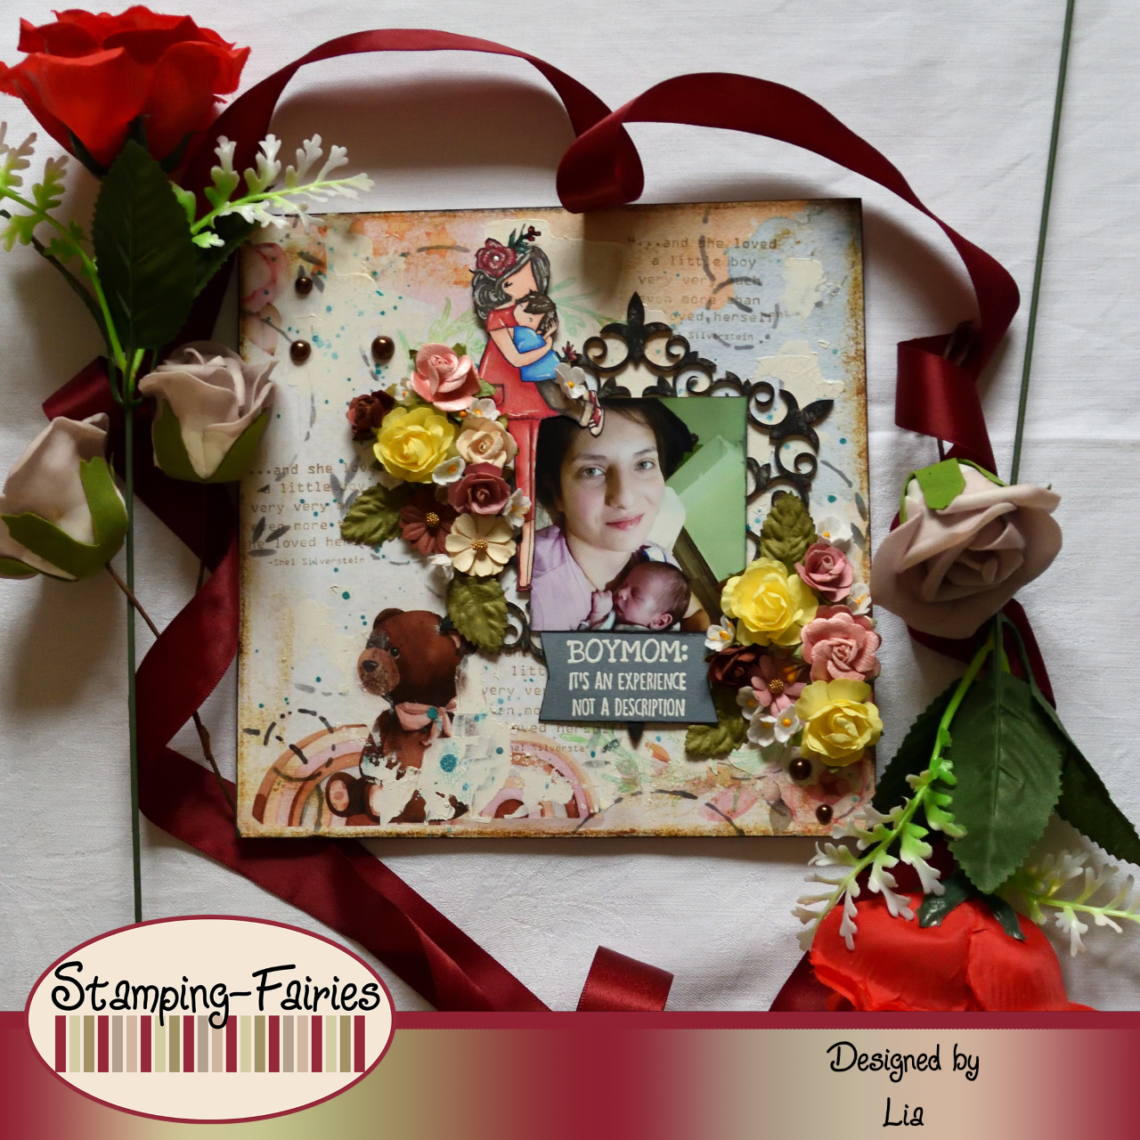
Hello everyone! I am Lia and I am here today with a new mixed media project. May has just begun and with it, the new Stamping Fairies Challenge has begun. The theme is „Mom and Dad“ and you can make whatever kind of project you like as long as it follows that theme. My project is made for Mother’s Day. Let’s start with the materials I used:
Materials
- Canvas
- Craft & You Paper Set – Baby Toys
- Ranger Multi Medium – Matte
- Archival ink
- Stamperia Stencil – Garlands
- Stamping Bella – CURVY GIRL collection – Curvy Girl Boy Mom
- Ranger Texture Paste Opaque Crackle
- Nellie’s Choice Clearstamp – Blooming Twig
- Distress Mica Stain – Shiny Bauble
- Ranger – Tim Holtz Distress Oxide Pad – Cracked Pistachio
- Memento Stempelkissen – Tuxedo Black
- Alcohol Markers
- SnipArt Chipboards Baroque Garden – Doily
- Prima Flowers – Mulberry Paper Flowers
- Tim Holtz idea-ology – Bouquet
- Tim Holtz – idea-ology – Droplets
- Grey Cardstock
- Nuvo Embossing Powder – Glacier White
- A photo (if you like to use one)

As always, I started with the background. I chose a piece from this lovely Craft & You Paper collection, called Baby Toys. The designs of those papers are so beautiful and the paper quality is really good! I cut a 20 x 20 cm piece of my paper and glued it on a 20 x 20 cm canvas, using Multi Medium Matte. I love this paper, but I wanted more!!! So, I used the Stamperia Garlands stencil with Black Archival ink, to add a circle design. I also used one of the sentiment stamps from the Stamping Bella Curvy Girl collection – Boymom stamp set with Vintage Photo Archival ink, to add a word design on my background. And because texture is never enough, I applied some Texture Crackle Paste, just with a spatula. I knew I was going to add elements on top of everything and I knew I wanted them off center, but I wanted something more on the background. So, I used the Nellie’s Choice Blooming Twig stamp with Cracked Pistachio Distress Oxide ink. It is good to remember that Distress Oxide inks are water reactive. I didn’t mind about that but if you want your designs to stay as you stamped them, you should consider using Archival or an other kind of permanent ink. In order to bring a little bit more blue into the project, I splattered the background with Distress Mica Shiny Bauble Stain Spray. This Mica Stain comes from the Holliday Set #4 and it is possibly one of my favourite blue colours! I used my two Archival inks, Vintage Photo and Black Soot, to add some coloure on the edges of my paper and the background was done!

It was time to prepare my focal point and I used several different pieces to do that. First I stamped the figure from the Stamping Bella Curvy Girl collection – Boymom stamp set, with Memento Tuxedo Black ink and I coloured it with alcohol markers. I cut it out and then I used my black alcohol marker to cover the white that was showing around the edges. Next, I pulled out a Chipboard Baroque Garden Doily by SnipArt and I used my black Archival inkpad to colour it. I love how the colour looks distressed and I would like to say that that was my reason for colouring it in this way but it was not… I was just lazy… please don’t judge me… I also pulled out a selection of Prima paper flowers. These flowers come in a big variety of sizes and colours and they are really lovely for projects like this one. Lastly, I prepared the main element. That is a photo of my little sister and her, then newborn, son. I love this picture! I am probably biased, because I really adore my little sister, which I practically raised, but isn’t she lovely??? Anyway, back to our theme! I printed the photo in the size I needed and then I darkened the edges with my black Archival ink.

My sentiment also comes from the Stamping Bella Curvy Girl collection – Boymom stamp set. It is heat embossed on grey cardstock, with Nuvo Glacier White embossing powder. It says „Boymom: it’s an experience, not a description“. Those of you who have sons can tell me if this sentiment speaks the truth or not. I placed everything on my background and then I added some Idea-Ology Droplets . These come from the Halloween set, but I thought that the colours fit my project, so I used them.

And that was the project for today! I had a lot of fun working with the materials and actually using a photo in a project! Do not forget, the Stamping Fairies Challenge will be running for the whole month. You can find more information about it in the Stamping Fairies Facebook and Instagram profiles. Come join us! We would love to see what you will make! I really hope you like today’s project! I hope you got inspired! We will see each other again next Monday! Until then, stay creative and have fun!
*Deutsche Version*
Hallo zusammen! Ich bin Lia und ich bin heute mit einem neuen Mixed-Media-Projekt hier. Der Mai hat gerade erst begonnen und damit auch die neue Stamping Fairies Challenge. Das Thema ist „Mama und Papa“ und ihr könnt jede Art von Projekt erstellen, das euch gefällt, solange es diesem Thema folgt. Mein Projekt ist für den Muttertag gemacht. Beginnen wir mit den Materialien, die ich verwendet habe:
Materialien
- Leinwand
- Craft & You Paper Set – Baby Toys
- Ranger Multi Medium – Matte
- Archival ink
- Stamperia Stencil – Garlands
- Stamping Bella – CURVY GIRL collection – Curvy Girl Boy Mom
- Ranger Texture Paste Opaque Crackle
- Nellie’s Choice Clearstamp – Blooming Twig
- Distress Mica Stain – Shiny Bauble
- Ranger – Tim Holtz Distress Oxide Pad – Cracked Pistachio
- Memento Stempelkissen – Tuxedo Black
- Alcohol Markers
- SnipArt Chipboards Baroque Garden – Doily
- Prima Flowers – Mulberry Paper Flowers
- Tim Holtz idea-ology – Bouquet
- Tim Holtz – idea-ology – Droplets
- Grauer Karton
- Nuvo Embossing Powder – Glacier White
- Ein Foto (wenn ihr eines verwenden möchtet)
Wie immer habe ich mit dem Hintergrund begonnen. Ich habe ein Stück aus dieser schönen Craft & You Paper-Kollektion namens Baby Toys ausgewählt. Die Designs dieser Papiere sind so schön und die Papierqualität ist wirklich gut! Ich habe ein 20 x 20 cm großes Stück meines Papiers ausgeschnitten und es mit Multi Medium Matte auf eine 20 x 20 cm große Leinwand geklebt. Ich liebe dieses Papier, aber ich wollte mehr!!! Also habe ich die Stamperia Garlands-Schablone mit schwarzer Archivtinte verwendet, um ein Kreisdesign hinzuzufügen. Ich habe auch einen der Stimmungsstempel aus der Stamping Bella Curvy Girl-Kollektion – Boymom-Stempelset mit Vintage Photo Archival Ink – verwendet, um meinem Hintergrund ein Wortdesign hinzuzufügen. Und weil Textur nie genug ist, habe ich etwas Texture Crackle Paste aufgetragen, einfach mit einem Spachtel. Ich wusste, dass ich Elemente über allem hinzufügen würde, und ich wusste, dass ich sie außerhalb der Mitte haben wollte, aber ich wollte etwas mehr im Hintergrund. Also habe ich den Nellie’s Choice Blooming Twig Stempel mit Cracked Pistachio Distress Oxide Tinte verwendet. Denkt daran, dass Distress Oxide-Tinten wasserreaktiv sind. Das hat mich nicht gestört, aber wenn ihr möchtet, dass eure Designs so bleiben, wie ihr sie gestempelt habt, solltet ihr die Verwendung von Archivtinte oder einer anderen Art von permanenter Tinte in Betracht ziehen. Um etwas mehr Blau ins Projekt zu bringen, habe ich den Hintergrund mit Distress Mica Shiny Bauble Stain Spray bespritzt. Dieser Mica Stain stammt aus dem Holliday Set #4 und ist möglicherweise eine meiner Lieblingsblaufarben! Ich habe meine beiden Archivtinten, Vintage Photo und Black Soot, verwendet, um etwas Farbe an den Rändern meines Papiers hinzuzufügen, und der Hintergrund war fertig!
Zeit, meinen Schwerpunkt vorzubereiten, und ich habe mehrere verschiedene Stücke benutzt, um das zu tun. Zuerst habe ich die Figur aus der Stamping Bella Curvy Girl Kollektion – Boymom Stempelset mit Memento Tuxedo Black Tinte gestempelt und mit Alkoholmarkern coloriert. Ich habe es ausgeschnitten und ich habe dann einen schwarzen Alkoholmarker benutzt, um das Weiß zu bedecken, das an den Rändern zu sehen war. Als nächstes habe ich ein barockes Gartendeckchen aus Spanplatte von SnipArt herausgezogen und mein schwarzes Archiv-Stempelkissen benutzt, um es zu färben. Ich liebe, wie die Farbe verzweifelt aussieht, und ich würde gerne sagen, dass es meine Absicht war, sie auf diese Weise zu färben, aber das war es nicht … Ich war nur faul … bitte verurteilt mich nicht … Ich habe auch eine Auswahl an Prima-Papierblumen hervorgeholt. Diese Blumen gibt es in einer großen Auswahl an Größen und Farben und sie sind wirklich schön für Projekte wie dieses. Zuletzt habe ich das Hauptelement vorbereitet. Das ist ein Foto von meiner kleinen Schwester und ihrem damals neugeborenen Sohn. Ich liebe dieses Bild! Ich bin wahrscheinlich voreingenommen, weil ich meine kleine Schwester, die ich praktisch aufgezogen habe, wirklich verehre, aber ist sie nicht süß??? Wie auch immer, zurück zu unserem Thema! Ich habe das Foto in der benötigten Größe ausgedruckt und dann die Ränder mit meiner schwarzen Archivtinte abgedunkelt.
Mein Spruch stammt auch aus dem Stempelset Stamping Bella Curvy Girl – Boymom. Es wird mit Prägepulver Nuvo Glacier White auf grauem Karton heißgeprägt. Da steht „Boymom: Es ist eine Erfahrung, keine Beschreibung“. Diejenigen von euch, die Söhne haben, können mir sagen, ob dieser Spruch wahr ist oder nicht. Ich habe alles auf meinem Hintergrund platziert und dann einige Idea-Ology Droplets hinzugefügt. Diese stammen aus dem Halloween-Set, aber ich dachte, dass die Farben zu meinem Projekt passen, also habe ich sie verwendet.

Und das war mein Projekt für heute! Es hat mir viel Spaß gemacht, mit den Materialien zu arbeiten und ein Foto tatsächlich in einem Projekt zu verwenden! Nicht vergessen, die Stamping Fairies Challenge läuft den ganzen Monat. Weitere Informationen dazu findet ihr auf den Facebook- und Instagram-Profilen der Stamping Fairies. Macht ihr mit! Wir würden gerne sehen, was ihr macht! Ich hoffe sehr, dass euch das heutige Projekt gefällt! Ich hoffe, ihr habt euch inspirieren lassen! Wir sehen uns nächsten Montag wieder! Bis dahin bleibt kreativ und habt Spaß!

Be Beautiful

You are invited.
Das könnte dich auch interessieren

It’s your Birthday
18. Juli 2019
Do you want a Cupcake?
21. August 2021
