Dreamy Flowers
*German version below | Deutsche Version unten*
Hello everyone! Welcome back to another mixed media project. For today I prepared a project following our Challenge Theme, which is Spring. I turned Rosettes into flowers! I hope I did well! Let’s start with the materials I used:
Materials (If something is not in stock, please simply click on “Product reminder”/ “Produkterinnerung”)
- Distress Mica Stain Sprays
- Rice Paper
- Ranger Multi Medium – Matte
- Distress Spray Stains
- Tim Holtz Layering Stencil – Linked Circles
- Stamperia Stencil – Postcard
- Ranger Texture Paste Opaque Crackle
- Mixed-Media Paper
- Sizzix Tim Holtz Thinlits – Vault Rosettes
- Ranger – Tim Holtz Distress Oxide Pads
- Tim Holtz Stamp Set – The Poinsettia
- SnipArt Chipboards
- Dina Wakley Heavy Body Acrylic Paint – Gilt / Gold
- Tim Holtz Small Talk Sticker Book
- Tim Holtz – Idea-Ology – Droplets – Christmas

For this project I worked on a thickboard panel. I had a piece of rice paper that I had previously used as a cover to protect my table. There was already paint on it. I believe it was Shiny Bauble Distress Mica Stain Spray. So I used this paper and Multi Medium Matte to cover the thickboard. I wanted a dark green background, so I chose Rustic Wilderness Distress Stain Spray. I applied the color through the Linked Circles Layering Stencil and then I flipped the stencil and pressed it on my project, in order to transfer the ink that was on it. I continued doing this all over the thickboard, using the Rustic Wilderness Distress Spray Stain, some Merry Mint Distress Mica Stain Spray and a little bit of Scorched Timber Distress Spray Stain. In the end I splattered the project with Unravelled Distress Mica Stain Spray and I dried it. I used the Scorched Timber Distress Spray Stain to splatter the project, dried it and then I used the Ranger Texture Crackle Paste with the Stamperia Postcard stencil to add a small text detail on my background. After the Paste was dry, I darkened the edges using Scorched Timber and Black Soot Distress Oxide inks and my background was done!

Time to prepare my images! I was so excited! I wanted to make flowers, but I wanted to make something like abstract flowers. I started by colouring a few panels of Mixed-Media paper. I used different coloures of Distress Oxide inks and different techniques. The yellow and red panels are simply ink blended with different yellows and reds. Then I used a stamp from the Poinsettia stamp set by Tim Holtz to add some text detail, I splattered them with black ink and dried them. The purple and the pink panel were done in the same way my background was made. I used the same stencil and I ink blended through it. Then I sprayed it with water, to make the ink sitting on the stencil move, and I pressed it on my panels. Practically, I used the stencil as a stamp. I kept doing that until the panels were fully colourd and then I added the text detail, I splattered the panels with ink and dried them. My blue panel was coloured with the ink smooshing technique. I also added some text detail, I splattered it with white ink and then I dried it. I used the Sizzix Vault Rosettes Thinlits set to cut Rosettes out of my panels. I cut all the medallions from my yellow panel and used them as flowers centers. I also made some extra little flowers with my leftover coloured paper and the medallion dies. Other than my flowers, I used some SnipArt Chipboards as accents. I used the Corals set, the Openwork Circles set and the Swirls set. I coloured them with Gold acrylic paint and placed them all around my Rosettes-flowers.

My sentiment comes from the Idea-Ology Small Talk Sticker Book. I coloured a little piece of paper with my Gold acrylic paint and then I attached the sentiment stripes on it and cut them out. My sentiment says „Be your beautiful self. Hold on tight to your dreams“ and in my mind I continued as „You are as beautiful and unique as these crazy flowers of mine!“ Aren’t we all??? I splattered my project with white ink, dried it and then I added a few white Idea-Ology Droplets.

And that was the project for today! Can you believe this is one of my first projects with Rosettes? They look intimidating but they are so easy to make! Just give it a try! Just remember, our Spring Challenge will be running until the end of the month. You can find more information about it in the Stamping Fairies profiles on Instagram and Facebook. I really hope you like today’s project! I hope you got inspired! We will see each other again next Monday! Until then, stay creative and have fun!
*Deutsche Version*
Hallo zusammen! Willkommen zurück zu einem weiteren Mixed-Media Projekt. Für heute habe ich ein Projekt vorbereitet, das unserem Challenge Thema folgt, nämlich dem Frühling. Ich habe Rosetten in Blumen verwandelt! Ich hoffe, ich habe es gut gemacht! Beginnen wir mit den Materialien, die ich verwendet habe:
Materialien (wenn etwas nicht auf Lager ist, bitte einfach auf „Produkterinnerung“ klicken)
- Distress Mica Stain Sprays
- Reis Papier
- Ranger Multi Medium – Matte
- Distress Spray Stains
- Tim Holtz Layering Stencil – Linked Circles
- Stamperia Stencil – Postcard
- Ranger Texture Paste Opaque Crackle
- Mixed-Media Papier
- Sizzix Tim Holtz Thinlits – Vault Rosettes
- Ranger – Tim Holtz Distress Oxide Pads
- Tim Holtz Stamp Set – The Poinsettia
- SnipArt Chipboards
- Dina Wakley Heavy Body Acrylic Paint – Gilt / Gold
- Tim Holtz Small Talk Sticker Book
- Tim Holtz – Idea-Ology – Droplets – Christmas

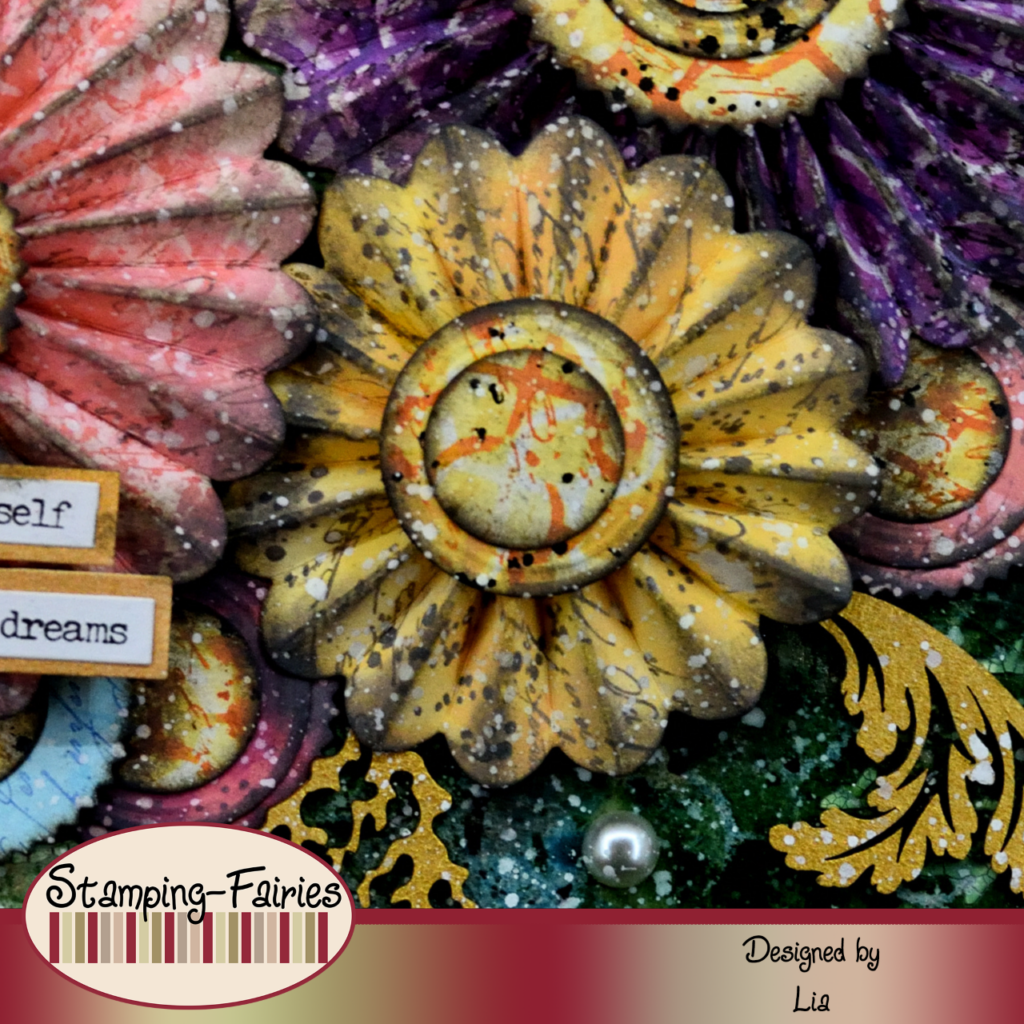
Für dieses Projekt habe ich an einer Dickfaserplatte gearbeitet. Ich hatte ein Stück Reispapier, das ich zuvor als Abdeckung zum Schutz meines Tisches verwendet hatte. Da war schon Farbe drauf. Ich glaube, es war Shiny Bauble Distress Mica Stain Spray. Also habe ich dieses Papier und Multi Medium Matte verwendet, um die Dickfaserplatte abzudecken. Ich wollte einen dunkelgrünen Hintergrund, also habe ich mich für Rustic Wilderness Distress Stain Spray entschieden. Ich habe die Farbe mit der Linked Circles Layering Schablone aufgetragen und dann die Schablone umgedreht und auf mein Projekt gedrückt, um die darauf befindliche Tinte zu übertragen. Ich habe fortgefahren, dies auf der ganzen dicken Platte zu tun, wobei ich den Rustic Wilderness Distress Spray Stain, etwas Merry Mint Distress Mica Stain Spray und ein wenig Scorched Timber Distress Spray Stain verwendet. Am Ende habe ich das Projekt mit Unravelled Distress Mica Stain Spray bespritzt und getrocknet. Ich habe den Scorched Timber Distress Spray Stain verwendet, um das Projekt zu bespritzen, habe es getrocknet und dann habe ich die Ranger Texture Crackle Paste mit der Stamperia Postcard Schablone verwendet, um ein kleines Textdetail auf meinem Hintergrund hinzuzufügen. Nachdem die Paste getrocknet war, habe ich die Ränder mit Scorched Timber und Black Soot Distress Oxide Tinten abgedunkelt und mein Hintergrund war fertig!


Zeit, meine Bilder vorzubereiten! Ich war so aufgeregt! Ich wollte Blumen machen, aber ich wollte so etwas wie abstrakte Blumen machen. Ich habe damit begonnen, ein paar Paneele Mixed-Media Papier auszumalen. Ich habe verschiedene Farben von Distress Oxide Tinten und verschiedene Techniken verwendet. Die gelben und roten Paneele bestehen einfach aus Tinte, die mit verschiedenen Gelb und Rottönen gemischt ist. Dann habe ich einen Stempel aus dem Poinsettia Stempelset von Tim Holtz verwendet, um einige Textdetails hinzuzufügen, sie mit schwarzer Tinte bestrichen und getrocknet. Das violette und das rosa Panel habe ich auf die gleiche Weise wie meinen Hintergrund gemacht. Ich habe die Tinte durch die gleiche Schablone aufgetragen. Dann habe ich sie mit Wasser besprüht, um die auf der Schablone sitzende Tinte zu aktivieren, und dann habe ich sie auf meine Platten gedrückt. So habe ich praktischerweise die Schablone als Stempel verwendet. Das habe ich so lange gemacht, bis die Tafeln vollständig eingefärbt waren, und dann habe ich die Textdetails hinzugefügt, die Paneele mit Tinte bespritzt und sie getrocknet. Mein blaues Panel wurde mit der Ink-Smooshing-Technik koloriert. Ich habe auch einige Textdetails hinzugefügt, sie mit weißer Tinte bespritzt und dann getrocknet. Ich habe das Sizzix Vault Rosettes Thinlits Set verwendet, um Rosetten aus meinen Paneelen auszuschneiden. Ich habe alle Medaillons aus meinem gelben Panel ausgeschnitten und sie als Blumenzentren verwendet. Außerdem habe ich aus meinem übriggebliebenen farbigen Papier und den Medaillon Stanzformen noch ein paar zusätzliche kleine Blumen gebastelt. Außer meinen Blumen habe ich einige SnipArt Chipboards als Akzente verwendet. Ich habe das Corals Set, das Openwork Circles Set und das Swirls Set verwendet. Ich habe sie mit goldener Acrylfarbe bemalt und sie rund um meine Rosetten-Blumen platziert.
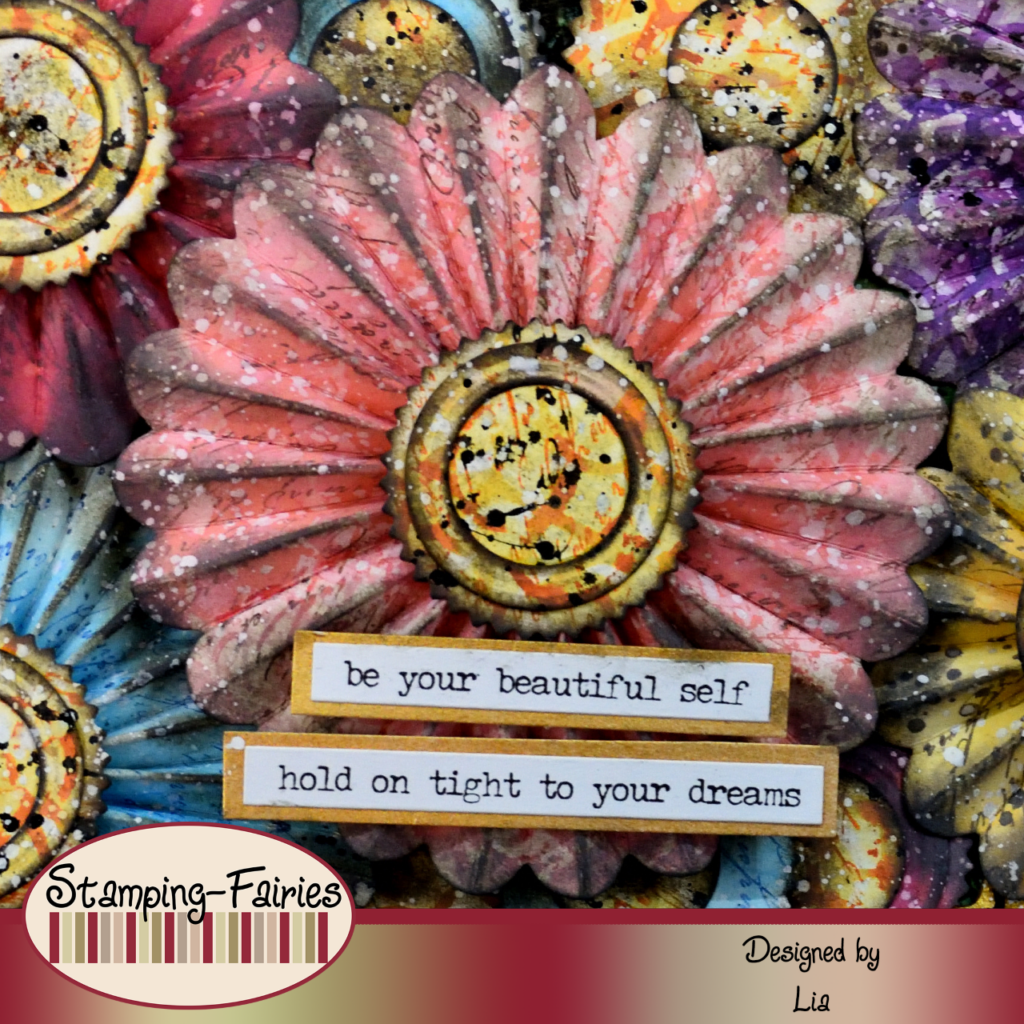
Mein Spruch stammt aus dem Idea-Ology Small Talk Sticker Book. Ich habe ein kleines Stück Papier mit meiner Gold Acrylfarbe bemalt und dann die Sentimentstreifen darauf befestigt und ausgeschnitten. Mein Spruch lautet: „Sei dein schönes Selbst. Halte an deinen Träumen fest“ und in Gedanken fuhr ich fort: „Du bist so schön und einzigartig wie diese verrückten Blumen von mir!“ Sind wir das nicht alle??? Ich habe mein Projekt mit weißer Tinte bespritzt, getrocknet und dann ein paar weiße Idea-Ology Droplets hinzugefügt.

Und das war das Projekt für heute! Könnt ihr glauben, dass dies eines meiner ersten Projekte mit Rosetten ist? Sie sehen einschüchternd aus, sind aber so einfach zuzubereiten! Probiert es einfach aus! Und denkt daran, dass unsere Frühlings Challenge bis Ende des Monats läuft. Weitere Informationen dazu findet ihr in den Stamping Fairies Profilen auf Instagram und Facebook. Ich hoffe sehr, dass euch das Projekt gefällt! Ich hoffe, ihr habt euch inspirieren lassen! Wir sehen uns nächsten Montag wieder! Bis dahin bleibt kreativ und habt Spaß!

Have a Sweet Spring

bärige Frühlingsgrüße
Das könnte dich auch interessieren
Autumn Blessings
4. Oktober 2023
Ein Törtchen zum Geburtstag
16. August 2021