Motherhood
*German version below | Deutsche Version unten*
Hello everyone! Welcome back to another mixed media project. Mother’s Day is around the corner, so I decided to prepare a project based on this theme. I used photos of two of my favourite people, which are my little sister and her little trouble maker! Let’s start with the materials I used:
Materials (If something is not in stock, please simply click on “Product reminder”/ “Produkterinnerung”)
- Craft & You Paper Set – Baby Toys 12″ x 12″
- Prima Marketing – Art Basics – Gesso Clear
- Stamperia Stencil – Garlands
- Tim Holtz Distress Grit Paste – Snowfall
- Tim Holtz Layering Stencil – Falling Stars
- Nuvo Mousse – Indian Gold
- Distress Oxide Sprays
- Ranger – Tim Holtz Distress Oxide Pads
- Tim Holtz Stempelset – The Poinsettia
- AALL & CREATE Clear Stamps
- Tim Holtz Layer Frames – Collage
- Prima Marketing Paper Flowers
- Tim Holtz idea-ology – Bouquet
- SnipArt Chipboards
- Tim Holtz Distress Watercolor Pencil – Scorched Timber
- Sizzix Tim Holtz Thinlits – Santa Greetings, Colorize
- Tim Holtz Small Talk Sticker Book
- Tim Holtz Gumdrops – Hearts

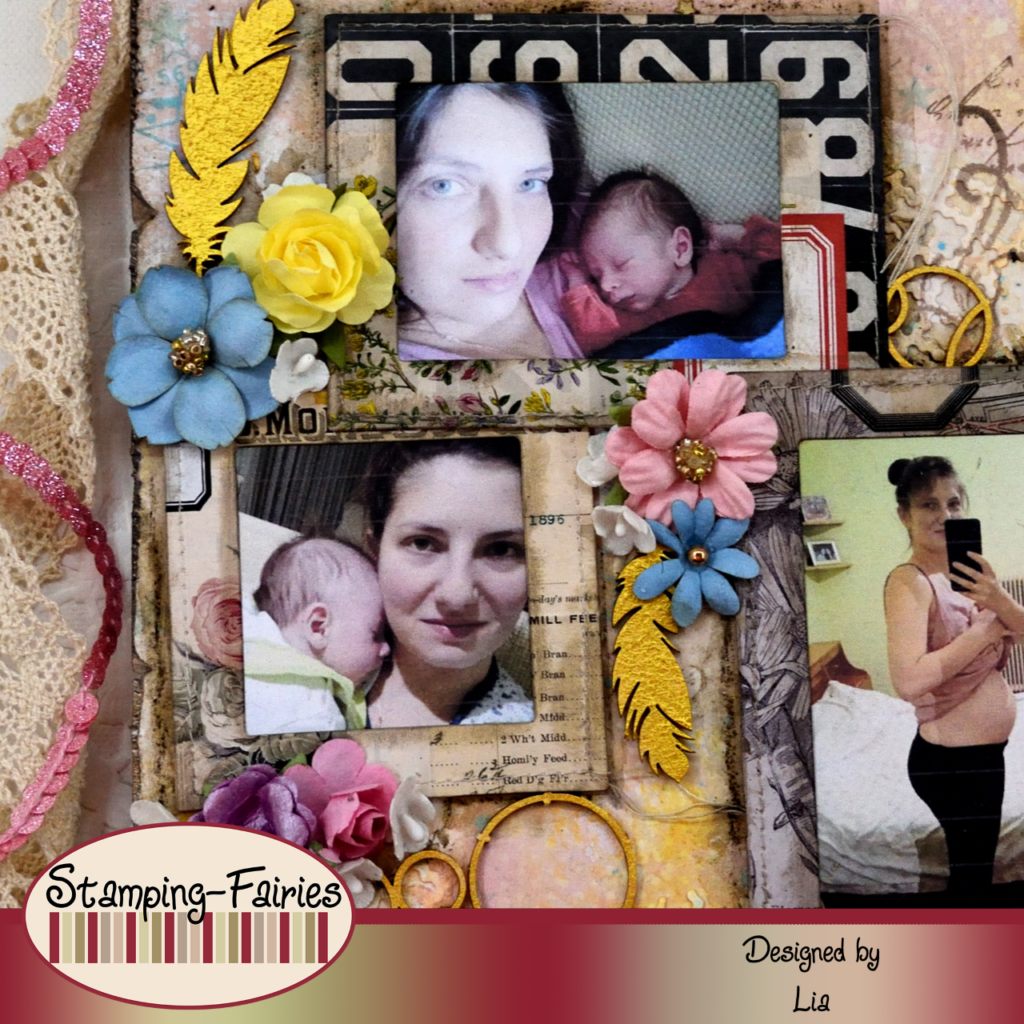
For today, I created a scrapbook page. The whole project is made on a lovely page from the Baby Toys – Craft & You Paper Set. I covered my page with clear Gesso and then I attached on it some pieces of lattice I cut with the Kaisercraft Texture Lattice die, which is unfortunately no longer available in the shop. I used the Stamperia Garlands stencil with Ranger Snowfall Distress Grit Paste, to add some nice circle texture. It ended up not showing very much, but that is ok. Then I used the Falling Stars Layering stencil with Nuvo Indian Gold Embellishment Mousse, to add some golden stars all over the project. My page already had some lovely colours on it, but I wanted to enhance them a little bit. For that, I used Distress Oxide Sprays, in colours Spiced Marmalade, Tattered Rose, Stormy Sky and Salvaged Patina. I used a brush to apply the colours, I sprayed with water, I left the colours to run and blend, dabbed off the excess and then I dried the page. I used the Salvaged Patina Distress Oxide Spray to splatter my project and then I dried it again. Time to add some stamping! I used an AALL & Create background stamp with a star pattern and the Salvaged Patina Distress Oxide ink to add some of that lovely visual texture on the background. This particular stamp is no longer available, but there are many other similar stamps in the AALL & Create selection in the shop. After that, I added some text details, using the text stamp from the The Poinsettia stamp set with Scorched Timber Distress Oxide ink. I used the same ink to darken the edges of the page and my background was done.

Time to prepare my focal points. As I said already, I used photos of my little sister and her son, the little trouble maker! I framed these photos with the Idea-Ology Collage Layer Frames, after I treated the edges of the Frames with Scorched Timber Distress Oxide ink. I arranged the photos on my page and then I added some decorations. I chose a few Prima flowers along with some small white blooms from the Idea-Ology Bouquet. And because that didn’t seem enough to me, I added some pieces of SnipArt Chipboards. I coloured the Chipboards with gold acrylic paint and I arranged them around the flowers and the photos. Then I used the Scorched Timber Distress Watercolour pencil and a water brush to add some shadows around my elements.


My sentiment consists of two parts. The first one is cut with the Sizzix Santa Greetings Colorize Thinlits set. I cut the letters out of a piece of mixed media paper I was using as a table cover when I was spraying. It has Tattered Rose and Shaded Lilac Distress Oxide Sprays on it. I also cut a second set of letters out of fun foam, to attach behind the first set of letters in order to add dimension. The second part of my sentiment comes from the Idea-Ology Small Talk Sticker Book. All together, the sentiment says „Motherhood. Hold tight and pretend it’s a plan“. I do believe that a lot of mothers feel like that. I know my sister does. After everything was placed on the page, I added a few Idea-Ology Gumdrops Hearts, as a last little bit of embellishment.

And that was the project for today! Let me add a disclaimer. I have taken permission from my sister to use hers and the baby’s photos like this. And I only use photos from when the boy was really small. I would recommend asking permission before you use photos of other people in your projects. I had a lot of fun making this page. I could think of a lot of other embellishments I could add to it but one must know when to stop (LOL). I really hope you like today’s project! I hope you got inspired! We will see each other again next Monday! Until then, stay creative and have fun!
*Deutsche Version*
Hallo zusammen! Willkommen zurück zu einem weiteren Mixed-Media Projekt. Der Muttertag steht vor der Tür und ich habe beschlossen, ein Projekt zu diesem Thema vorzubereiten. Ich habe Fotos von zwei meiner Lieblingsmenschen verwendet, nämlich meiner kleinen Schwester und ihrem kleinen Unruhestifter! Beginnen wir mit den Materialien, die ich verwendet habe:
Materialien (wenn etwas nicht auf Lager ist, bitte einfach auf „Produkterinnerung“ klicken)
- Craft & You Paper Set – Baby Toys 12″ x 12″
- Prima Marketing – Art Basics – Gesso Clear
- Stamperia Stencil – Garlands
- Tim Holtz Distress Grit Paste – Snowfall
- Tim Holtz Layering Stencil – Falling Stars
- Nuvo Mousse – Indian Gold
- Distress Oxide Sprays
- Ranger – Tim Holtz Distress Oxide Pads
- Tim Holtz Stempelset – The Poinsettia
- AALL & CREATE Clear Stamps
- Tim Holtz Layer Frames – Collage
- Prima Marketing Paper Flowers
- Tim Holtz idea-ology – Bouquet
- SnipArt Chipboards
- Tim Holtz Distress Watercolor Pencil – Scorched Timber
- Sizzix Tim Holtz Thinlits – Santa Greetings, Colorize
- Tim Holtz Small Talk Sticker Book
- Tim Holtz Gumdrops – Hearts
Für heute habe ich eine Scrapbook Seite erstellt. Das gesamte Projekt ist auf einer schönen Seite aus dem Baby Toys – Craft & You Papierset erstellt. Ich habe meine Seite mit klarem Gesso bedeckt und dann einige Gitterstücke darauf befestigt, die ich mit der Kaisercraft Texture Lattice Stanze ausgeschnitten habe, die leider nicht mehr im Shop erhältlich ist. Ich habe die Stamperia Garlands Schablone mit Ranger Snowfall Distress Grit Paste verwendet, um eine schöne Kreistextur hinzuzufügen. Am Ende war davon nicht viel sichtbar, aber das ist in Ordnung. Dann habe ich die Falling Stars Layering Schablone mit Nuvo Indian Gold Embellishment Mousse verwendet, um dem gesamten Projekt einige goldene Sterne hinzuzufügen. Meine Seite hatte bereits einige schöne Farben, aber ich wollte sie noch ein wenig verbessern. Dafür habe ich Distress Oxide Sprays in den Farben Spiced Marmalade, Tattered Rose, Stormy Sky und Salvaged Patina verwendet. Ich habe die Farben mit einem Pinsel aufgetragen, mit Wasser besprüht, die Farben sich einwirken und verblenden lassen, den Überschuss abgetupft und dann die Seite getrocknet. Ich habe das Salvaged Patina Distress Oxide Spray verwendet, um mein Projekt zu bespritzen, und habe es dann erneut getrocknet. Zeit, etwas Stempel hinzuzufügen! Ich habe einen AALL & Create Hintergrundstempel mit Sternmuster und die Salvaged Patina Distress Oxide Tinte verwendet, um dem Hintergrund etwas von dieser schönen visuellen Textur hinzuzufügen. Dieser besondere Stempel ist nicht mehr verfügbar, aber es gibt viele andere ähnliche Stempel in der AALL & Create Auswahl im Shop. Danach habe ich einige Textdetails hinzugefügt, indem ich den Textstempel aus dem Stempelset „The Poinsettia“ mit Scorched Timber Distress Oxide Tinte verwendet habe. Ich habe die gleiche Tinte verwendet, um die Ränder der Seite abzudunkeln, und schon war mein Hintergrund fertig.


Zeit, meine Schwerpunkte vorzubereiten. Wie gesagt, ich habe Fotos von meiner kleinen Schwester und ihrem Sohn, dem kleinen Unruhestifter, verwendet! Ich habe diese Fotos mit den Idea-Ology Collage Layer Frames eingerahmt, nachdem ich die Kanten der Rahmen mit Scorched Timber Distress Oxide Tinte behandelt habe. Ich habe die Fotos auf meiner Seite arrangiert und dann einige Dekorationen hinzugefügt. Ich habe ein paar Prima Blumen zusammen mit einigen kleinen weißen Blüten aus dem Idea-Ology Bouquet ausgewählt. Und weil mir das noch nicht genug schien, habe ich noch ein paar Stücke SnipArt Chipboards hinzugefügt. Ich habe die Chipboards mit goldener Acrylfarbe bemalt und sie um die Blumen und die Fotos herum angeordnet. Dann habe ich den Scorched Timber Distress Aquarellstift und einen Wasserpinsel verwendet, um einige Schatten um meine Elemente herum hinzuzufügen.


Mein Spruch besteht aus zwei Teilen. Das erste wird mit dem Sizzix Santa Greetings Colorize Thinlits Set geschnitten. Ich habe die Buchstaben aus einem Stück Mixed-Media Papier ausgeschnitten, das ich beim Sprühen als Untergrund verwendet hatte. Darauf sind Tattered Rose und Shaded Lilac Distress Oxide Sprays angebracht. Ich habe auch einen zweiten Buchstabensatz aus Schaumstoff ausgeschnitten, um ihn hinter dem ersten Buchstabensatz anzubringen, um ihm mehr Dimension zu verleihen. Der zweite Teil meines Spruchs stammt aus dem Idea-Ology Small Talk Sticker Book. Alles in allem lautet das Motto: „Mutterschaft. Halt dich fest und tu so, als wäre es ein Plan.“ Ich glaube, dass es vielen Müttern so geht. Ich weiß, dass meine Schwester das fühlt. Nachdem alles auf der Seite platziert war, habe ich als letzte kleine Verzierung ein paar Gumdrops Herzen von Idea-Ology hinzugefügt.

Und das war das Projekt für heute! Lass mich einen Haftungsausschluss hinzufügen. Ich habe die Erlaubnis meiner Schwester eingeholt, ihre Fotos und die des Babys so zu verwenden. Und ich verwende nur Fotos aus der Zeit, als der Junge noch ganz klein war. Ich würde empfehlen, um Erlaubnis zu bitten, bevor ihre Fotos von anderen Personen in euren Projekten verwenden. Es hat mir viel Spaß gemacht, diese Seite zu erstellen. Ich könnte mir viele andere Verzierungen vorstellen, die ich hinzufügen könnte, aber man muss wissen, wann man aufhören muss (LOL). Ich hoffe sehr, dass euch das Projekt gefällt! Ich hoffe, ihr habt euch inspirieren lassen! Wir sehen uns nächsten Montag wieder! Bis dahin bleibt kreativ und habt Spaß!

Sending Smooches

12.Mai ist Muttertag
Das könnte dich auch interessieren

4x Halloween in klein
4. Oktober 2021
Happy Halloween
21. Oktober 2023
