Be Thankful
*German version below | Deutsche Version unten*
Hello everyone! Welcome back to another mixed media project. Do you want to know how to make a Thanksgiving project without specific Thanksgiving products? Well, that is exactly what I am going to show you today! Let’s start with the materials I used:
Materials (If something is not in stock, please simply click on “Product reminder”/ “Produkterinnerung”)
- Tim Holtz Collage Paper
- Ranger Multi Medium – Matte
- Finnabair Art Basics – Heavy Gesso White (Tube)
- Tim Holtz Layering Stencil – Deco Floral
- Ranger Distress Texture Paste – Translucent
- Distress Oxide Sprays
- Distress Mica Stains
- Tim Holtz Stamp Set -MR. Rabbit
- VersaFine Onyx Black
- Tim Holtz Backdrops – Halloween
- Sizzix Tim Holtz Thinlits – Alphanumerics Shadow Upper
- Tim Holtz Small Talk Sticker Book

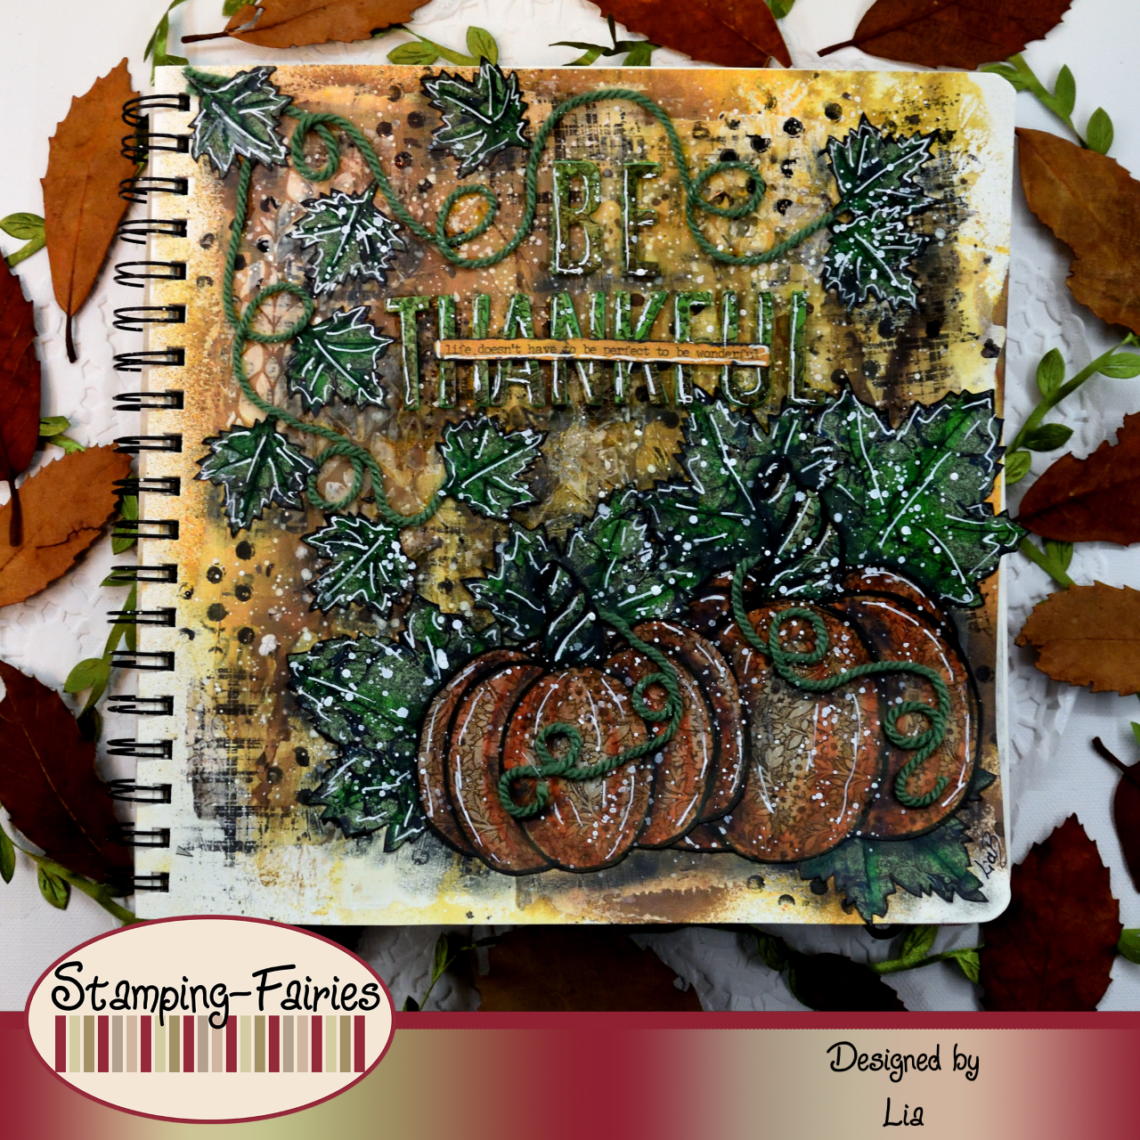
I made this project in a mixed media book and I started with the background. White pages are very often intimidating. One thing we can do about it is to start with a sort of collage. In this case, I used two Idea-Ology Collage Papers, the Typograthy/Typographie and the Typeset/Composer, but just about any collage paper would be ok. I cut the papers into small pieces and then I glued them on my page, using Multi Medium Matte. I dried the glue and then I used a spatula to apply some white Gesso on top of everything, to tone down the design of the collage papers and to prepare the page for my inks. Before I add colour, I wanted some texture. So, I used the Floral Layering stencil with Distress Translucent Texture Paste on random places of my page. I do like corners, so most of the stencil design is on the corners and most of it got covered in the end, but that is ok! Next step was to add colour. I used Spiced Marmalade and Vintage Photo Distress Oxide Sprays and Fallen Acorn and Harvest Moon Distress Mica Stain Sprays. The process is the same as always. I sprayed with the colours, sprayed with water, let the colours move and blend (it helps to lift the project and let gravity do the job), dabbed off the excess and then I dried the page. For some more visual texture, I did some stamping, using some stamps from the Tim Holtz „Mr. Rabbit“ stamp set and VersaFine Onyx Black ink. I did not darken the edges on this project. I really like how the spray spatter is visible on some spots around the edges and the focal points are dark enough to attract the eye on their own.

Time to prepare my images. I promised non Thanksgiving products! So, I used papers from an Idea-Ology Backdrops set and I cut my images out of them. It is a Halloween Backdrops set but just about any Idea-Ology Backdrops set would do. I didn’t use dies for my images, I sketched them myself. If you do not feel comfortable with sketching, you could always download a template from the internet. I cut two pampkins, a big and a smaller one, along with leaves in three sizes. My images didn’t exactly have the colours I wanted, so first I covered them with Multi Medium Matte, I dried them and then I used my Faber-Castell Pitt Artist Pens to add some more colour. This step could be done with Distress inks, Distress Crayons or even Distress watercolours pencils. Just keep in mind what surface you use what on. I needed a non porous surface to use my Pitt Artist Pens. If I was using inks or watercolour pencils, I wouldn’t need to add Multi Medium on the images. Just pay attention to the properties of your mediums. On with the project, I attached the images on my page. I used a little bit of green yarn to create the tendrils and I attached the smaller leaves on them.

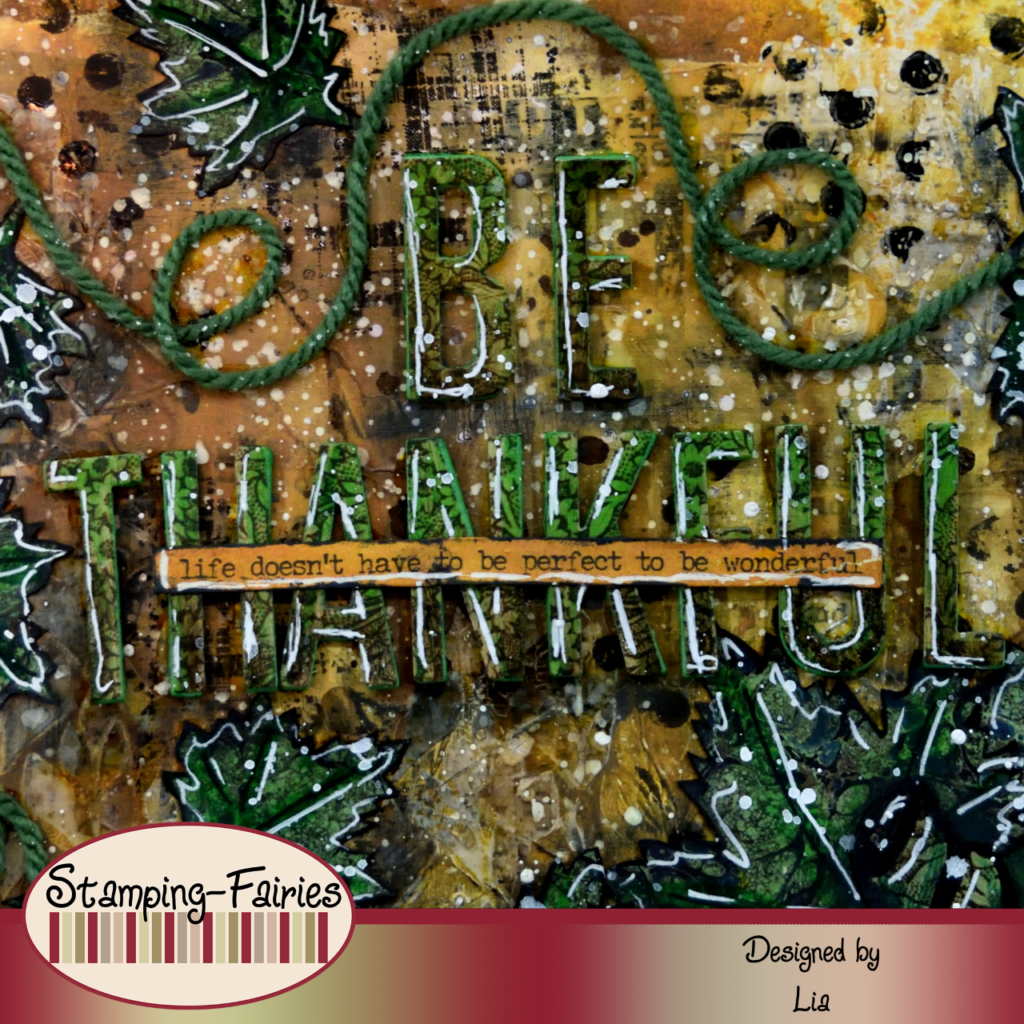
My sentiment consists of two parts. The first part is cut out of the same paper as my pumpkins, with the Sizzix Alphanumeric Shadow Upper Thinlits set. The second part comes from the Idea-Ology Small Talk Sticker Book. I chose a white sentiment stripe and I coloured it with Carved Pumpkin Distress Oxide ink. All together, the sentiment says: „Be Thankful. Life doesn’t have to be perfect to be wonderful“ and what a wonderful thought that is! Very often we lose ourselves in pursuit of more and we forget to appreciate what we already have! I placed the sentiment on my page and then I added some highlights, using a white Gelly Roll pen. In the end, I heavily splattered the page with white ink.
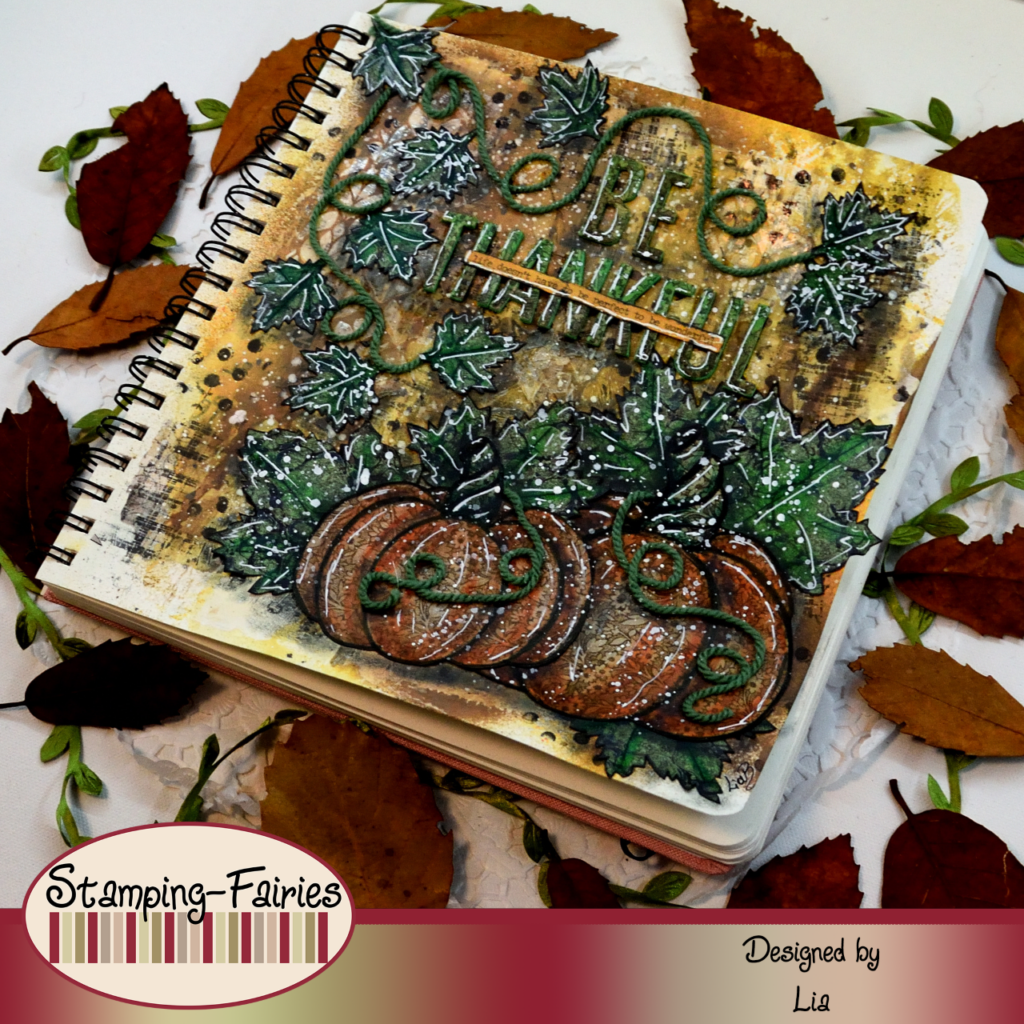
And that was the project for today! This page ended up a little darker than I wanted it to be, but that is ok. Sometimes, projects end up as they want, no matter what we want! It’s like they have a mind of their own. I really hope you like today’s project! I hope you got inspired! We will see each other again next Monday! Until then, stay creative and have fun!
*Deutsche Version*
Hallo zusammen! Willkommen zurück zu einem weiteren Mixed-Media Projekt. Möchtet ihr wissen, wie man ein Thanksgiving Projekt ohne spezielle Thanksgiving Produkte umsetzt? Genau das werde ich euch heute zeigen! Beginnen wir mit den Materialien, die ich verwendet habe:
Materialien (wenn etwas nicht auf Lager ist, bitte einfach auf „Produkterinnerung“ klicken)
- Tim Holtz Collage Paper
- Ranger Multi Medium – Matte
- Finnabair Art Basics – Heavy Gesso White (Tube)
- Tim Holtz Layering Stencil – Deco Floral
- Ranger Distress Texture Paste – Translucent
- Distress Oxide Sprays
- Distress Mica Stains
- Tim Holtz Stamp Set -MR. Rabbit
- VersaFine Onyx Black
- Tim Holtz Backdrops – Halloween
- Sizzix Tim Holtz Thinlits – Alphanumerics Shadow Upper
- Tim Holtz Small Talk Sticker Book
Ich habe dieses Projekt in einem Mixed-Media Buch gemacht und mit dem Hintergrund begonnen. Weiße Seiten wirken oft einschüchternd. Eine Möglichkeit, dagegen vorzugehen, ist, mit einer Art Collage zu beginnen. In diesem Fall habe ich zwei Idea-Ology Collage Papiere verwendet, Typograthy/Typographie und Typeset/Composer, aber so ziemlich jedes Collagepapier wäre in Ordnung. Ich habe die Papiere in kleine Stücke geschnitten und sie dann mit Multi Medium Matte auf meine Seite geklebt. Ich habe den Kleber getrocknet und dann mit einem Spachtel etwas weißes Gesso auf alles aufgetragen, um das Design der Collagepapiere abzumildern und die Seite für meine Tinten vorzubereiten. Bevor ich Farbe hinzufüge, wollte ich etwas Textur. Also habe ich die Floral Layering Schablone mit Distress Translucent Texture Paste an zufälligen Stellen meiner Seite verwendet. Ich mag Ecken, also befindet sich das meiste Schablonendesign an den Ecken und das meiste davon wurde am Ende abgedeckt, aber das ist mir recht! Der nächste Schritt war, Farbe hinzuzufügen. Ich habe Spiced Marmalade und Vintage Photo Distress Oxide Sprays sowie Fallen Acorn und Harvest Moon Distress Mica Stain Sprays verwendet. Der Vorgang ist der gleiche wie immer. Ich habe die Farben gesprüht, sie mit Wasser besprüht, die Farben sich bewegen und vermischen lassen (es hilft, das Projekt anzuheben und die Schwerkraft die Arbeit machen zu lassen), den Überschuss abgetupft und dann die Seite getrocknet. Für mehr visuelle Struktur habe ich etwas gestempelt, mit einigen Stempeln aus dem Stempelset „Mr. Rabbit“ von Tim Holtz und VersaFine Onyx Black Tinte. Ich habe die Ränder bei diesem Projekt nicht abgedunkelt. Mir gefällt sehr, wie die Sprühspritzer an einigen Stellen an den Rändern sichtbar sind und die Schwerpunkte dunkel genug sind, um allein das Auge anzuziehen.

Zeit, meine Bilder vorzubereiten. Ich habe versprochen, keine Thanksgiving Produkte zu verwenden! Also habe ich Papier aus einem Idea-Ology Backdrops Set verwendet und meine Bilder daraus ausgeschnitten. Es ist ein Halloween Backdrops Set, aber so ziemlich jedes Idea-Ology Backdrops Set ist geeignet. Ich habe für meine Bilder keine Stanzformen verwendet, sondern sie selbst skizziert. Wenn ihr euch beim Skizzieren nicht wohl fühlt, könnt ihr jederzeit eine Vorlage aus dem Internet herunterladen. Ich habe zwei Kürbisse ausgeschnitten, einen großen und einen kleineren, zusammen mit Blättern in drei Größen. Meine Bilder hatten nicht genau die Farben, die ich wollte, also habe ich sie zuerst mit Multi Medium Matte bedeckt, sie getrocknet und dann mit meinen Faber-Castell Pitt Artist Pens etwas mehr Farbe hinzugefügt. Dieser Schritt kann mit Distress Tinten, Distress Crayons oder sogar Distress Aquarellstiften durchgeführt werden. Denkt nur daran, auf welcher Oberfläche ihr was verwendet. Ich brauchte eine nicht poröse Oberfläche, um meine Pitt Artist Pens zu verwenden. Wenn ich Tinten oder Aquarellstifte verwenden würde, müsste ich den Bildern kein Multi Medium hinzufügen. Achtet einfach auf die Eigenschaften eures Mediums. Weiter mit dem Projekt, ich habe die Bilder auf meiner Seite befestigt. Ich habe ein wenig grünes Garn verwendet, um die Ranken zu erstellen, und ich habe die kleineren Blätter daran festgeklebt.

Mein Spruch besteht aus zwei Teilen. Der erste Teil ist aus demselben Papier wie meine Kürbisse ausgeschnitten, mit dem Sizzix Alphanumeric Shadow Upper Thinlits Set. Der zweite Teil stammt aus dem Idea-Ology Small Talk Sticker Book. Ich habe einen weißen Spruchstreifen gewählt und ihn mit Carved Pumpkin Distress Oxide-Tinte eingefärbt. Insgesamt sagt der Spruch: „Sei dankbar. Das Leben muss nicht perfekt sein, um wundervoll zu sein“ und was für ein wunderbarer Gedanke das ist! Sehr oft verlieren wir uns in der Jagd nach mehr und vergessen zu schätzen, was wir bereits haben! Ich habe den Spruch auf meine Seite gelegt und dann mit einem weißen Gelly Roll Stift einige Highlights hinzugefügt. Zum Schluss habe ich die Seite reichlich mit weißer Tinte bespritzt.
Und das war das Projekt für heute! Diese Seite ist etwas düsterer geworden, als ich wollte, aber das ist ok. Manchmal enden Projekte so, wie sie wollen, ganz egal, was wir uns wünschen! Es ist, als hätten sie ihren eigenen Kopf. Ich hoffe sehr, dass euch das Projekt gefällt! Ich hoffe, ihr habt euch inspirieren lassen! Wir sehen uns nächsten Montag wieder! Bis dahin bleibt kreativ und habt Spaß!

Schmetterlingschwarm

Bee Happy
Das könnte dich auch interessieren
Stand Tall
22. Mai 2024
What’s Up?
18. Februar 2020