Explore
*German version below | Deutsche Version unten*
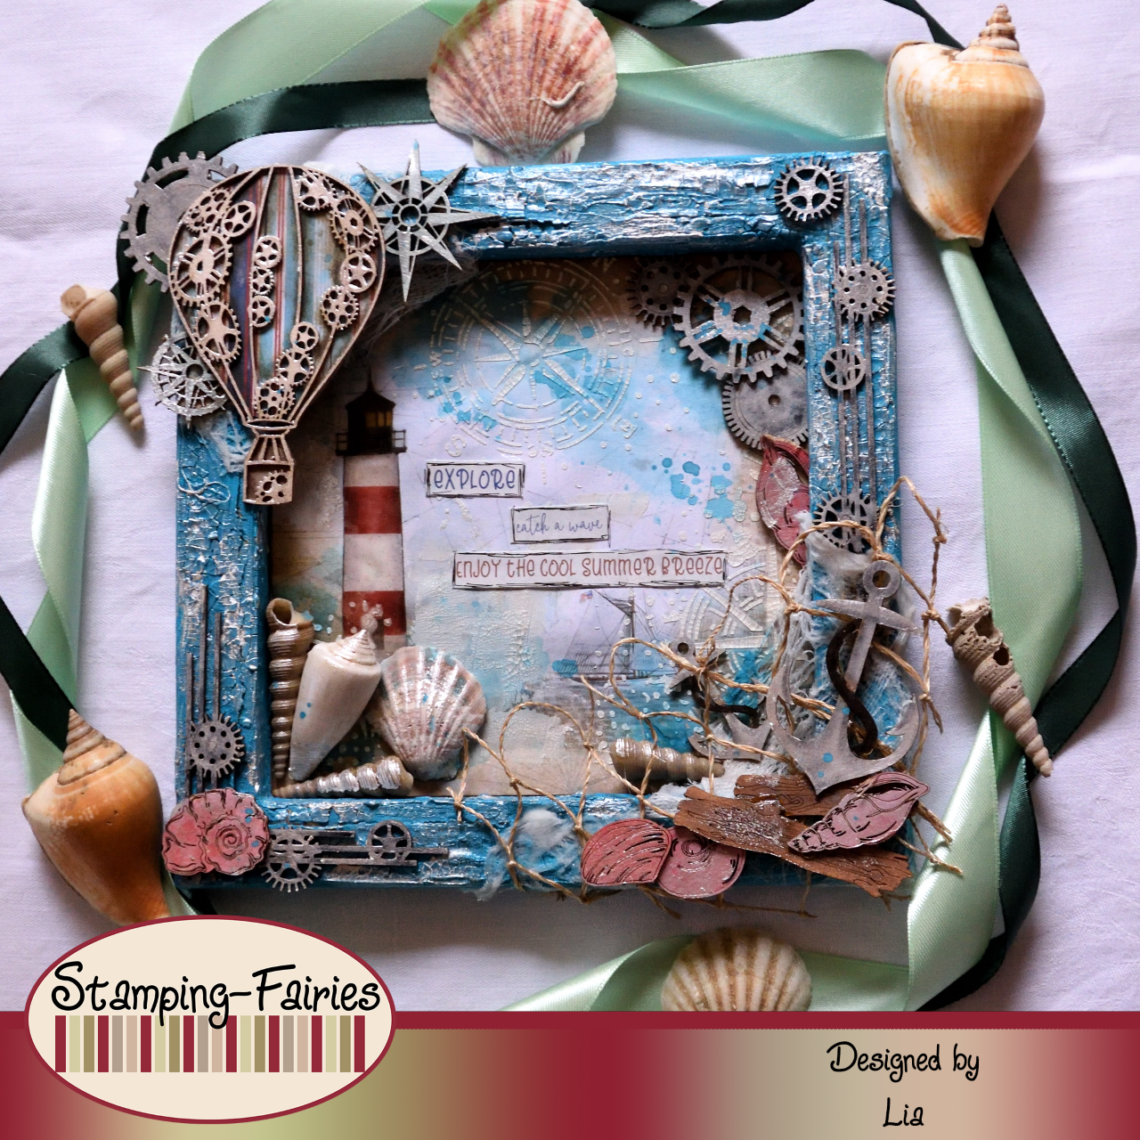
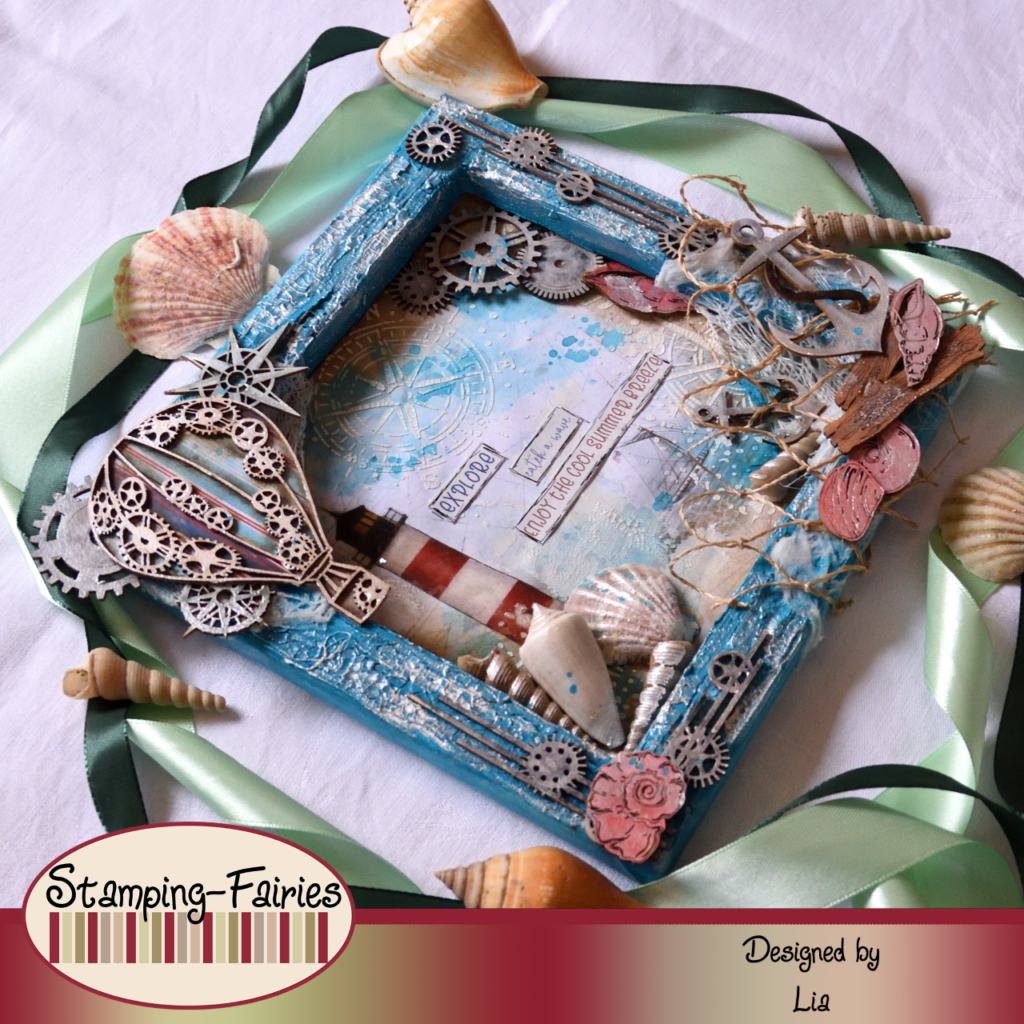
Hello everyone! Welcome back to another mixed media project. This time I created a shadow box, my very first ever, following the theme of our July challenge, which is Vacation. I composed a nautical-traveling scene, because for me vacation means sea! Let’s start with the materials I used:
Materials
- Canvas
- Ranger Texture Paste Opaque Crackle
- Distress Paints
- Ranger Multi Medium – Matte
- Simple Stories – 6″x8″ Paper Pad – Simple Vintage Vintage Seas
- Stamperia Stencil – Compass
- SnipArt Chipboards
- Distress Oxide Sprays
- Liquid Pearls – White Opal
- Prima Metallique Wax – White Pearl
- P13 – Beyond the Sea – Set 01
- Seashells, gauze and twine net for decoration
- Ranger Glossy Accents

For my shadow box I used the back side of a 20x20cm canvas. First, I applied Ranger Texture Crackle Paste on the frame and then I coloured it with a mixture of Mermaid Lagoon and Lost Shadow Distress paint. I like to use the Lost Shadow to tone down other colours. It works really lovely! For the actual background, I chose one of the papers from the 6″x8″ Simple Stories Simple Vintage Vintage Seas paper pad. I cut my pattern paper to my canvas‘ size and then I added some more detail and texture by using the Stamperia Compass stencil with Crackle Paste. I used Multi Medium Matt to glue the pattern paper in the shadow box and then I covered the lighthouse image of the paper with Glossy Accents. I just wanted that structure to stand out a little more and I thought that Glossy accents would give it a somewhat 3D effect. At this point the background was basically done.

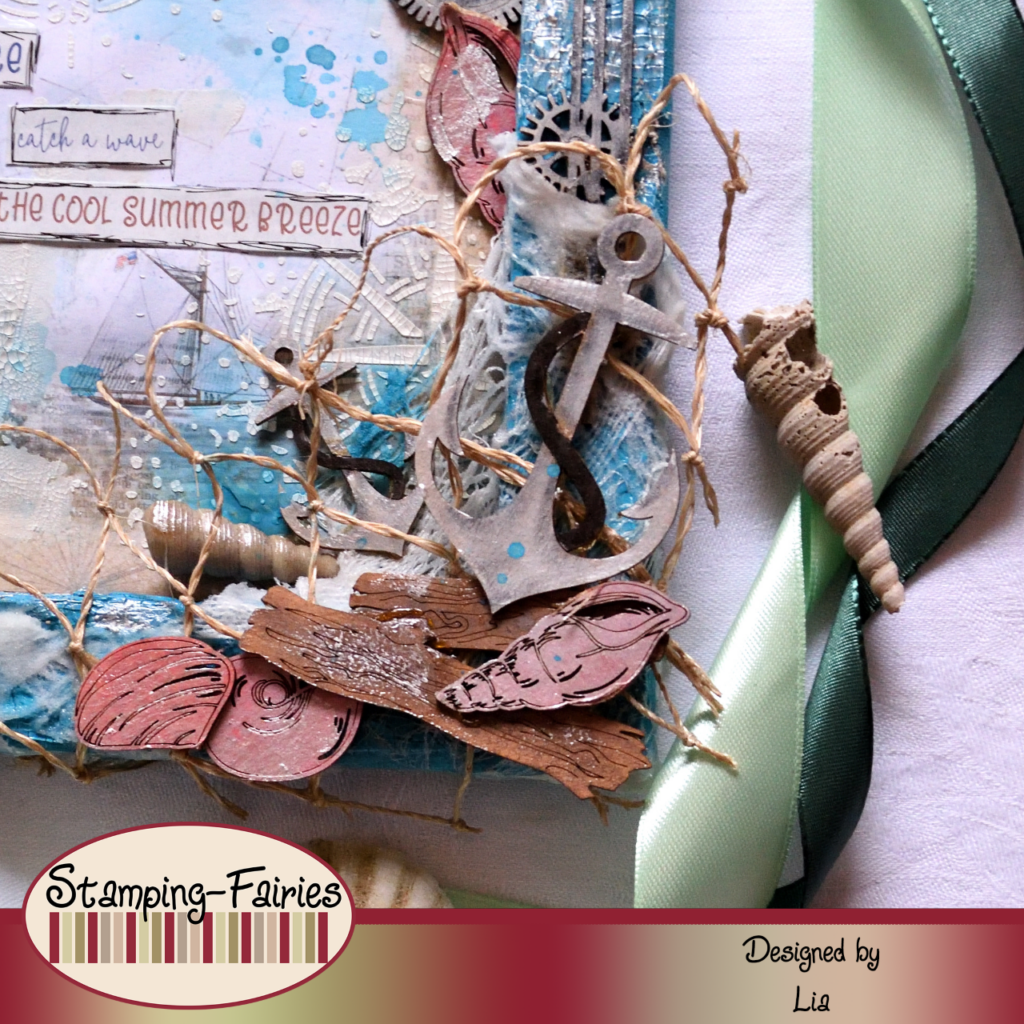
This time I used a lot of different elements to decorate my project. I call them decorations and not focal points because, this time, my sentiment works as focal point and it lies inside the shadow box. But, let’s get back to out elements. I used a lot of SnipArt Chipboards. I have some gears and gear borders, loges, seashells, compasses, anchor and a hot air balloon. Some of them are coloured with Distress paints and some of them with Distress Oxide sprays. I also used a little bit of White Opal Liquide Pearls on the seashells. Aside from the Chipboards, t I used a few real seashells and also a piece of gauze and a piece of twine net. I spent some time trying to arrange everything on my project. Once I was happy with the placement, I glued everything down and then I used the Art Alchemy White Pearl Metallique Wax over pretty much everything. I love how the texture of the Crackle Paste catches the wax. It was a detail I needed on this project!
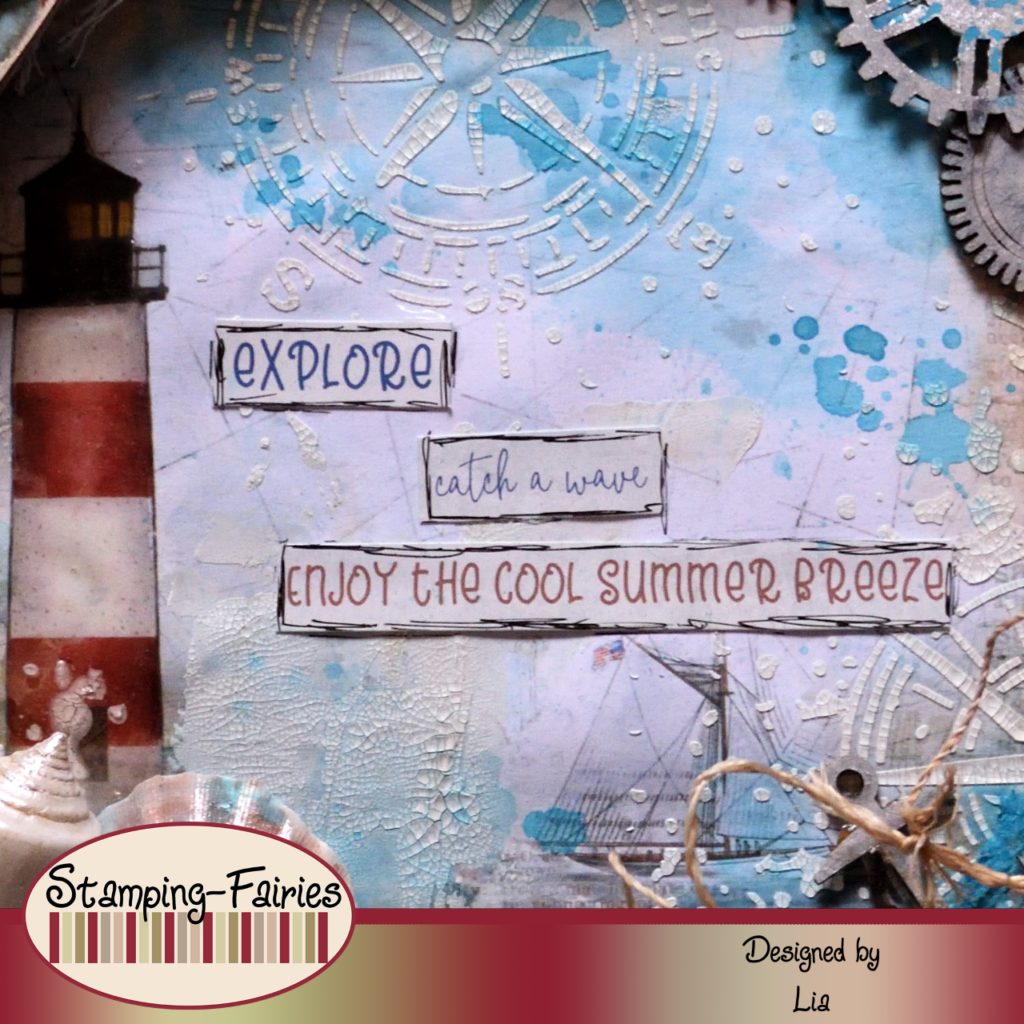
My sentiment comes from the P13 Beyond the Sea Sentiment Sticker Set 01. It says „Explore. Catch the wave. Enjoy the cool summer breeze“. It really makes me nostalgic! I need vacation too!!! Anyway! After everything was placed, I realized that I needed a little bit more colour on the background. To add that, I used my Mermaid Lagoon Distress paint diluted with water. I added the paint with a paint brush, sprayed it with more water, dabbed the excess with a paper towel and then dried it with the heat gun. I repeated this process until I was happy with the result and then I used the same paint to splatter my project!
And that was the project for today! I really miss being next to the sea! The Greek in me is screaming! The Stamping Fairies challenge will be running until the end of July! You can find more information about it at the Stamping Fairies Facebook and Instagram profiles. Come play with us! I really hope you like today’s project! I hope you got inspired! We will see each other again next Monday! Until then, stay creative and have fun!
*Deutsche Version*
Hallo zusammen! Willkommen zurück zu einem weiteren Mixed-Media-Projekt. Dieses Mal habe ich eine Schattenbox geschaffen, meine Allererste überhaupt, die dem Thema unserer Juli-Challenge folgt, nämlich Urlaub. Ich habe eine nautische Reiseszene komponiert, denn für mich bedeutet Urlaub Meer! Beginnen wir mit den Materialien:
Materialien
- Leinwand
- Ranger Texture Paste Opaque Crackle
- Distress Paints
- Ranger Multi Medium – Matte
- Simple Stories – 6″x8″ Paper Pad – Simple Vintage Vintage Seas
- Stamperia Stencil – Compass
- SnipArt Chipboards
- Distress Oxide Sprays
- Liquid Pearls – White Opal
- Prima Metallique Wax – White Pearl
- P13 – Beyond the Sea – Set 01
- Muscheln, Gaze und Schnurnetz zur Dekoration
- Ranger Glossy Accents
Für meine Schattenbox habe ich die Rückseite einer 20 x 20 cm großen Leinwand verwendet. Zuerst habe ich Ranger Texture Crackle Paste auf den Rahmen aufgetragen und die dann mit einer Mischung aus Mermaid Lagoon und etwas Lost Shadow Distress Farbe gefärbt. Ich verwende den Lost Shadow gerne, um andere Farben zu dämpfen. Das funktioniert wirklich wunderbar! Für den eigentlichen Hintergrund habe ich eines der Papiere aus dem 6 x 8 Zoll großen Simple Stories Simple Vintage Vintage Seas-Papierblock genommen. Ich habe mein Musterpapier auf die Größe meiner Leinwand zugeschnitten und dann mit der Stamperia Compass-Schablone und Crackle Paste weitere Details und Texturen hinzugefügt. Ich habe Multi Medium Matt verwendet, um das Musterpapier in die Schattenbox zu kleben, und dann habe ich das Leuchtturmbild des Papiers mit Glossy Accents überzogen. Ich wollte nur, dass diese Struktur etwas mehr hervorsticht, und dachte, dass Glossy Accents ihr einen 3D-Effekt verleihen würden. Zu diesem Zeitpunkt war der Hintergrund im Wesentlichen fertig.
Dieses Mal habe ich viele verschiedene Elemente verwendet, um mein Projekt zu dekorieren. Ich nenne sie Dekorationen und nicht Schwerpunkte, weil dieses Mal mein Spruch als Fokus fungiert und es innerhalb der Schattenbox liegt. Aber kommen wir zurück zu unseren Elementen. Es sind viele SnipArt-Chipboards, einige Zahnräder und Zahnradränder, Logen, Muscheln, Kompasse, Anker und ein Heißluftballon. Einige davon sind mit Distress-Farben und andere mit Distress-Oxid-Sprays gefärbt. Ich habe auch ein wenig White Opal Liquid Pearls für die Muscheln verwendet. Abgesehen von den Chipboards habe ich bei diesem Projekt ein paar echte Muscheln sowie ein Stück Gaze und ein Stück Schnurnetz verwendet. Ich habe einige Zeit damit verbracht, alles zu arrangieren. Nachdem ich mit der Platzierung zufrieden war, habe ich alles festgeklebt und dann größtenteils mit Art Alchemy White Pearl Metallique Wax überzogen. Ich liebe es, wie die Textur der Crackle Paste das Wachs einfängt. Es war ein Detail, das ich bei diesem Projekt brauchte!
Mein Spruch stammt vom P13 Beyond the Sea Sentiment Sticker Set 01. Es heißt „Entdecke. Fange die Welle. Genieße die kühle Sommerbrise“. Es macht mich wirklich nostalgisch! Ich brauche auch Urlaub!!! Ohnehin! Nachdem alles platziert war, wurde mir klar, dass ich etwas mehr Farbe für den Hintergrund brauchte. Dazu habe ich meine mit Wasser verdünnte Mermaid Lagoon Distress Farbe verwendet. Ich habe die Farbe mit einem Pinsel aufgetragen, mit mehr Wasser besprüht, den Überschuss mit einem Papiertuch abgetupft und dann mit der Heißluftpistole getrocknet. Ich habe diesen Vorgang wiederholt, bis ich mit dem Ergebnis zufrieden war, und dann dieselbe Farbe benutzt, um mein Projekt zu besprühen!
Und das war mein Projekt für heute! Ich vermisse es wirklich, direkt am Meer zu sein! Der Grieche in mir schreit! Die Stamping Fairies-Challenge läuft bis Ende Juli. Weitere Informationen dazu findet ihr auf den Facebook- und Instagram-Profilen von Stamping Fairies. Komm, spiel mit uns! Ich hoffe sehr, dass euch das Projekt gefällt! Ich hoffe, ihr habt euch inspirieren lassen! Wir sehen uns nächsten Montag wieder! Bis dahin bleibt kreativ und habt Spaß!

Guiding Light

Wenn weg, dann weg!
Das könnte dich auch interessieren
Happy Birthday Girl
8. September 2024
Arctic World
19. Oktober 2020